Monday, September 20, 2010

Arrrr! It's a Pirate Party


My son, Jackson, turns 4 years old tomorrow, and he declared that he wanted a pirate birthday party. What fun it has been planning for this party, making the invitations, the decorations and Jackson's birthday card.

The whole family got involved in making message-in-the-bottle invitations, swords and pirate ships to decorate the tables. And I had a blast making a special card for the little swashbuckler who stole my heart four years ago.

I'm so happy with how the invitations turned out, even if my kitchen did smell like coffee for days after aging all those invitations and treasure maps!


When Jackson saw this card that I made for one of his friend's birthday celebrations, he said he wanted one like it for his birthday. But I had something else in mind for my favorite toddler.


I decided to make an extra-special 3D pop-up treasure chest card for him. I hope he likes it. I'm more excited to see his reaction when he opens this card tomorrow than when he opens his presents.


I'll post more creative details of the party later. I hope you enjoy these sneak peeks!

Wednesday, July 28, 2010

Ahoy, there!


It's birthday season for the toddler set.

From late summer to fall, we get invited to a lot of birthday parties for my son's little friends. This past weekend, we attended a birthday party for a 3-year-old, and I made this card to celebrate his day.

I used the retired Stampin' Up set, Boatloads of Love, to create this super-cute card. I cut the waves freehand, using card stock and some Stampin' Up designer series paper. I used some of my Stampin' Up markers to color the boat and smoke, then I cut those out and added some dimension behind them. The clouds were created using my new large scallop punch -- how clever is that? --and again I added some dimension to puff them up.

You can't see it because I forgot to take a photo of the inside of the card, but I stamped three candles inside below the words "Make a wish." I love the added touch of stamping the envelope. I think it gives your cards such a custom appearance.

This was completely unintentional, but I am so pleased with how well the card matches the wrapping paper that I used. I'd already wrapped the gift before I made the card, so perhaps that informed my color choices. But I really didn't set out to match the card to the package. But now that I realize how "Martha Stewart" that makes me look, I'm going to do that more often!

In fact, I'll have another chance this week. We have another birthday party to attend.

And then, I need to get busy making invitations and favors for my son's 4th birthday in September.

When he saw this boat card, he informed me that he wanted this card for his 4th birthday. But I've got bigger surprises planned for him. He's having a pirate party, and he'll be getting a cool homemade card to match the theme!

Tuesday, July 13, 2010

It's Strawberry Season


Well, technically, I guess strawberry season has passed. But not in my craft room.

I was inspired by a project I saw in the August issue of Stampin' Success, the magazine for Stampin' Up demonstrators, and an online tutorial for making strawberries using the Big Shot and a floral die. (If you're interested in becoming a Stampin' Up demonstrator and getting amazing benefits like 20 percent off all your Stampin' Up products and great creative inspiration like Stamping Success, email me. You can pursue Stampin' Up as a business or sign up as a hobby demonstrator like me.)

I had to change things up just a bit since I don't have the Flower Folds die for my Big Shot. I used the Bigz Island Floral Die from Stampin' Up's Summer Occasions Mini catalog, and I think it worked out just fine.

These cards combine some great new and old Stampin' Up card stock, stamps, ink and tools with some other items that I had in my craft supplies stash. This proves just how versatile Stampin' Up products are. You can combine them with other goodies that you have.

For example, I embellished the Birthday Wishes Card with some red gingham ribbon that I've had for years and a denim brad I purchased at a discount store. I also used an eyelet border punch that I bought before I discovered Stampin' Up.

The card also uses the Square Lattice embossing folder and the Punch Windows Movers & Shapers die. I used Crumb Cake, Real Red, Certainly Celery, Night of Navy and Whisper White card stock and Cherry Cobbler ink. The stamp set is Occasional Quotes from the 2011 Stampin' Up catalog. The ribbon is a green polka dot from a set called Elementary.

On the second card, I used almost exclusively Stampin' Up products. The only exceptions are the strawberries and the flower. I embossed them using a swirly embossing folder purchased at a craft store.

This card uses Real Red, Whisper White and textured Soft Suede card stock, as well as some super-sweet polka dot designer series paper (retired). I stamped with Old Olive ink and used my Punch Windows die to make the scalloped oval with the sentiment.

I jazzed things up with some striped grosgrain ribbon in Chocolate Chip (retired) and added a sweet little button to the flower. Again, I used the Occasional Quotes stamp set.

I just love these two yummy cards!

Monday, July 12, 2010

Do Something Creative Every Day


I've not written this "goal" down anywhere, but in the back of my mind, I've challenged myself to do something creative every day. Some people may not enjoy or need to express themselves creatively, but I've found that I'm a better, happier person when I'm allow myself to make something.

Sometimes, I need to get out of my brain, away from my to-do and must-do lists and my mountain of "real" work and housework and just play.

This "Create" card is a great reminder for me to make time to nurture myself creatively. Another load of laundry can wait. Ditto those two episodes of "True Blood" I have on the DVR.

Making cards is just one way that I fulfill my need for creativity. Though I'd love to, I usually can't make time every day for card making or scrapbooking. Here are just a few ways that I get my daily creative fix, when I can't spare the time for a bigger project:

  • writing a clever sentence in an email to a friend or even posting a carefully-crafted witticism on Facebook.
  • coloring with my little boy
  • cooking something different or special
  • making up a story or silly song to entertain my child
  • doodling in a notebook
  • daydreaming
  • planning my dream house and decorating it in my head

My son, who is almost 4, provides great creative inspiration for me. We started doing arts and crafts projects when he was just a wee little thing, and now "making a craft" is his favorite activity. We're constantly wading through piles of paper and picking up arts and craft projects he has created on the sticker covered, ink-stained table in his room.

At least once a day -- and usually many more times -- Jackson comes into my home office/craft room asking to borrow my stapler so he can make a book or to borrow my punches for some craft project or another. It amazes what his little mind comes up with -- whether it's the story of the "rakeosaurus" dinosaur who lives near our house and drinks from a chocolate milk lake or puppets crafted from cotton swabs and stickers.

He takes such joy in his finished projects and in creating them. And that inspires me to have a little creative fun myself.

I doubt I'll ever create another thing as creative as Jackson. But I plan to urge him to nurture his creativity for a lifetime, while I do the same.

Here's how I made the "Create" card. All products are Stampin' Up.

Ink: Not Quite Navy, Old Olive, Close to Cocoa

Card Stock: Textured Soft Suede, Perfect Plum, Not Quite Navy, Whisper White

Designer Series Paper: Garden Gala, Bella Bleu

Stamp Sets: Charming

Ribbon: Elementary

Tools: Big Shot, Textured Embossing Folder, Curly Label punch, Corner Rounder punch

Sunday, July 11, 2010

A Friend of Vintage


I'm in love with all things vintage. If your grandma loved it, chances are that I will, too.

That's one reason I'm absolutely loving Stampin' Up's new Vintage Wallpaper Textured Embossing Folder. I'd love to have a dining room or a bathroom wallpapered in this fabulous textured pattern. This goodie was one of my first purchases from the new Stampin' Up catalog, which just came out July 1. (My wish list is almost as long as the catalog!)

I made this card with lots of goodies from the new catalog, including new card stock, inks and the Garden Gala designer series paper. I created the textured paper by running some Whisper White card stock through my Big Shot in the Vintage Wallpaper embossing folder. I aged the paper by sponging on some Crumb Cake ink, Stampin' Up's new kraft-colored ink. (As my pal, Melissa Young says, this color is like khaki pants. It goes with everything. I agree.)

When I finished the card, I thought it needed a little something more. So, I added a special embellishment -- a beaded pearl earring that I bought years ago at a vintage clothing store. I love unexpected details like that! I love this card so much that it's going to be hard to send it to someone. It will definitely go to someone very special.

Here's what I used to make this vintage card. With the exception of the vintage earring, all items are Stampin' Up.

Card Stock: Daffodil Delight, Marina Mist, Whisper White

Designer Series Paper: Garden Gala

Ink: Marina Mist, Crumb Cake

Stamp Sets: Vintage Vogue,

Ribbon: Elementary

Other goodies: Big Shot, Vintage Wallpaper embossing folder, The Tearing Edge, Corner Rounder punch

Tuesday, June 8, 2010

Happy Anniversary Mom & Dad


On June 10, my parents will celebrate than 39th wedding anniversary. (How old does that make me?) So, I wanted to make them a special card.

I think I've succeed with this labor of love that literally took me hours to plan and to make and made a mess of my crafting space! (I'm not a neat stamper. I spread my supplies EVERYWHERE and always have quite a mess to clean up. That's because I have to fiddle around with things to find just the right paper, color and stamp combinations. My designs don't just come to me, even though I wish they did.)

A few cards from the Stampin' Fabulous Melissa Young inspired this card. I wanted to copy her idea of using panels on a larger card. But I wanted to do something just a little bit different and have mine open in the center.

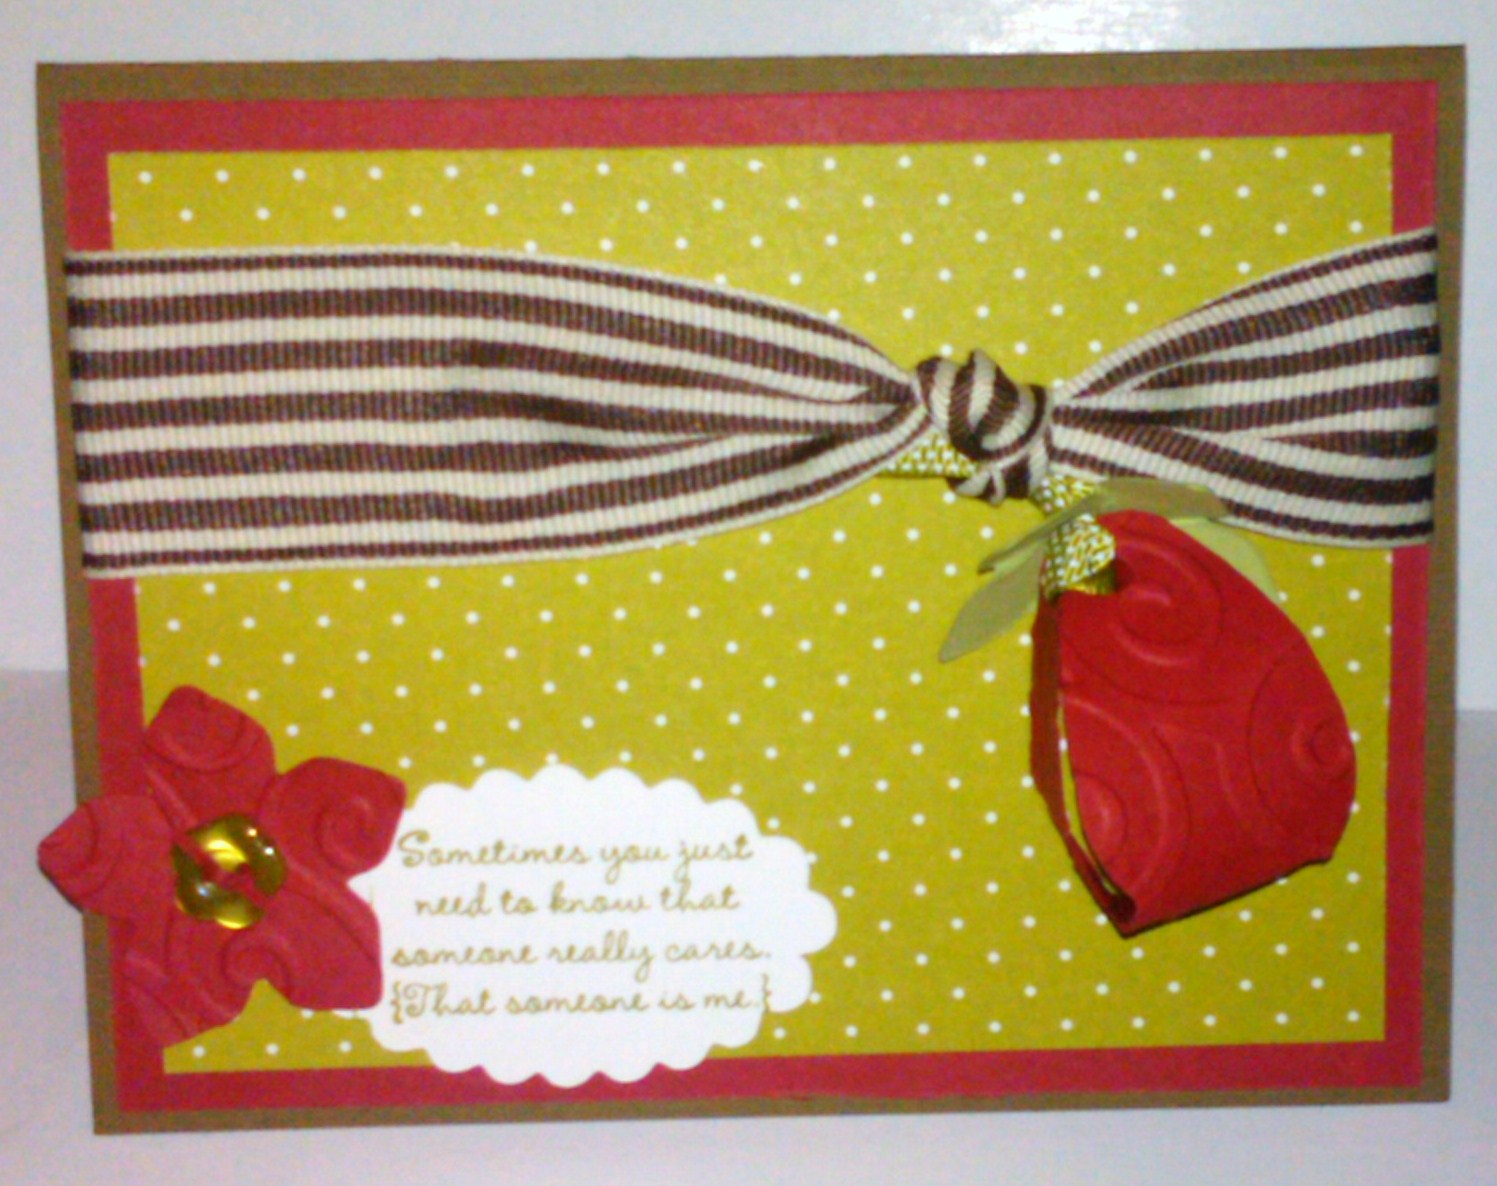
I used an 8.5 by 11 piece of retiring Bordering Blue cardstock as my base, then embellished the heck out of this card, adding texture, background stamps, ribbon, birds and even a little bling inside.

I'm a fairly new stamper, though I have been scrapbooking for years, when I can find the time. Though you might not be able to tell it, this card demonstrates just how much of a novice I am because I messed up a lot. However, it also proves that sometimes mistakes can inspire even greater creativity.

For example, the circle on the front of this card where I've stamped the sentiment was punched out of a piece of scrap Bordering Blue cardstock that I was experimenting with. I was playing around with my Ballet Blue ink and Medallion background stamp, trying to decide if I wanted to use that as the background of my card.

Ultimately I decided that would be too busy. But when it came time to punch the circle where I'd stamp the sentiment, I discovered that my scrap paper worked perfectly. In fact, the design I created very closely matches one of the designs in the Bella Bleu Designer Series Paper Pack (used here for the blue bird).

I used another of these Medallion circles inside the card to cover another oopsie. Originally, I had stamped the sentiment on the bottom right corner on the inside of the card. But I wasn't pleased with the placement or the clarity of the stamped words. So, I stuck another circle there and jazzed it up with one of those gorgeous punched birds. Instead of a paper wing, I added a heart-shaped button with a pearl -- something that's been in my craft stash for years.

This card uses a lot of items that will be retiring soon, so if you fall in love with something you see on my card, better order it now before it's retired on July 1.

Here are all the ingredients I used in my card (Retiring items are marked with an asterisk):

Card Stock: Bordering Blue*, So Saffron

Designer Series Paper: Bella Bleu*

Inks: Close to Cocoa*, Ballet Blue*

Stamp Sets: En Francais, Medallion and Whimsical Words

Ribbon: 1/4-inch chocolate chip grosgrain

Other goodies: Big Shot, Flourish texture plate, Top Note Die, 2-Step Bird Punch, 1.25-inch circle punch

Tuesday, June 1, 2010

Teacher Thank You Cards


My son had the great fortune of having the absolute best teachers at his preschool this year. I wanted to do something special to honor each of them and to express our gratitude for all they've done for Jackson and all they've put up with this past school year.

I decided to make them each a handmade card to go along with some small gifts we got for them.

I just love the colors on Mrs. Mullins' card. And I absolutely love the spiral punch from Stampin' Up, and the Thank You embossing folder that I used to add texture to the card.

Mrs. Smith, Jackson's other teacher, is participating in a walk for breast cancer. We wanted to make a donation in her name, so I thought a gift card holder would be the perfect presentation. I can't take credit for this design; I adapted a technique that I learned at one of Melissa Young's (aka my Stampin' Up pimp) workshops. I used My Digital Studio, Stampin' Up's software for creating digital scrapbook layouts, cards and other designs, to create a customized gift card for Mrs. Smith. (Stay tuned: I'll be debuting scrapbook pages from our recent trip to Disney, created with My Digital Studio.)


I hope you like these cards. I sure had fun making them. And thanks again to Mrs. Mullins and Mrs. Smith for making Jackson's school year so special and so memorable. You set the bar very high!